Friday, February 11, 2011

Speeding up Firefox

If you have a fast computer, you may want to eliminate the quarter-second delay before Firefox draws a page on the screen. If you have a slow machine, you probably want to leave the delay there, because the total time to draw the page on the screen will probably increase.
Here’s how:
  1. Open the Configuration window by typing about:config in the address bar and pressing Enter.
  2. Right-click any blank place in the Configuration window and choose New – Integer Firefox comes up with a New Integer Value dialog box
  3. Type nglayout.initialpaint.delay in the box and click OK. Firefox asks for an integer value.
  4. Type 0 (that’s the number zero) and then click OK. The Configuration window shows a new Preference Name called nglayout.initialpaint.delay, with a value of 0.
  5. Close all the copies of Firefox that are running. The next time you start Firefox, your setting takes effect. Hold onto your hat. That quarter-second can be almost perceptible

View stored Password in Firefox

If you use Firefox to browsing and open a website and then entering a user-name and password on the website, Firefox will give three choices for you, “Remember”, “Never for this Site” and “Not Now”.  If choosing “remember”, your password and username will be stored in Firefox database. This facility very helpful if you often forget with your username and password and using your own computer. But if you use public computer such as office computer or family computer you must select “Never for this Site” and “Not Now” to save your privacy.
If you have clicked “remember”, some one can view and open your personal  information on internet. But i recommend using “never of this site” or “not now” to save your data and never click “remember”
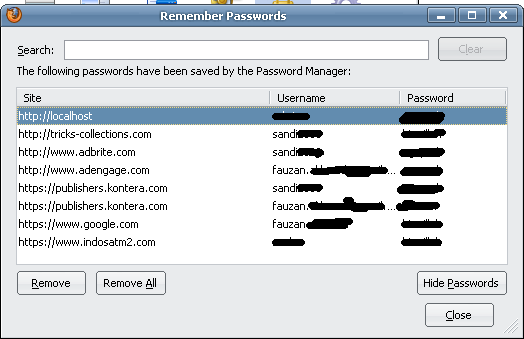
firefox-stored-password1
To view stored password in Firefox you can follow the following steps:
  • Tools – options and then click security tab
firefox-stored-password-2
  • Click “show passwords” button to view stored password in Firefox and then click “Show passwords” button. The passwords save as plain text format, so, each and everyone can read the data without tools.
firefox-stored-password-3
Tips to save your privacy if using Firefox:
  • Don’t click remember button if entered a password and user name
  • Delete private data from Firefox after browsing by using “Tools– Clear Private data” or click “Ctrl + Shift + Del” button.

Pray Times Add-on for Firefox

The Firefox add-ons for Moslem user only. When browsing is possible often forget to pray. To remind time prayed this add-on could probably assist. Pray times add-on automatic playing of Azan sound when have entered time prayed. For Moslem user don’t forget to Pray. This add-on designed by “Hamid Zarrabi-Zadeh”
There are two method to install this add-on, that is Offline install and online install
pray-firefox
Online install this add-on
  • Open this URL Pray Times!
    pray-firefox2
  • Klik “Add to Firefox”.
  • If using Firefox browser this add-ons will install automatically in firefox
  • And click install now
Offline install
or everyone if no internet connection in your computer no problem
  • Download pray times add-ons by right clicking this link pray_times!-1.1.3-fx.xpi and select save link as. This add-ons support all Firefox version.
  • Click “Open File” and then select the add-on, then click open to install.
  • Click Install now
Features pray times add-ons:
  • Various methods of time calculation
  • Countdown to each prayer time
  • Automatic playing of Adhan sound
  • Supporting all locations around the world
  • Local calculation of prayer times (no connection to Internet is needed)
Setting-up Pray time info in Firefox
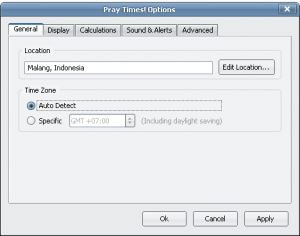
pray-firefox3

  • Right click pray time option in the right-bottom of Firefox or Open Tools – Add-ons then click Extensions tab, click options.
  • Edit locations and time zone and the click apply.

FoxTab, Make Firefox Tab 3D

Be fed up with ordinary appearance of Firefox, you wish appearance of tab yours Firefox cast in a different mold, install FoxTab add-on. FoxTab brings innovative and attractive 3D tab management to Firefox and work with firefox 3.0 till firefox 3.1b3 and supports for Windows XP, Windows Vista, Mac OS X Leopard, and Linux (Ubuntu 8.03 & 8.04 , Mandriva 2008 & 2009) but not support for Ubuntu 8.10 (FoxTab 1.1.2). FoxTab provide 5 fascinating eye candy layouts, FoxTab takes the tabbed-browsing experience to a new level. FoxTab enables grouping, filtering, closing and switching between tabs quickly and easily. This add-ons require flash player installer in the Firefox. If Flash Player add-on not be installed in Firefox will emerge following appearance (see picture
How to use FoxTab?
Its easy, After installed the add-on, restart the Firefox (required). Will be there new icon in the firefox toolbar (see picture – blue rectangle). Click the icon to launch FoxTab.

How to Install FoxTab add-ons?

To online install open below link then click add to firefox. Following the instruction till finish.
https://addons.mozilla.org/en-US/firefox/addon/8879
Online install, right click link below and select save link as for firefox, if using IE select save target as.
https://addons.mozilla.org/en-US/firefox/downloads/file/46582/foxtab-1.1.2-fx.xpi

Mouse Gestures Firefox Addons

Until newest version of firefox (firefox 3.5), there no mouse gesture feature in firefox. But with an adons you can add mouse gesture feature in Firefox. Do not like gesture feature in Opera, in firefox there custom feature. so you can edit, adding or delete mouse gesture function.
Following mouse gesture addons for firefox. But this version does not work in Firefox 3.5.
  • Download Mouse gesture redox: https://addons.mozilla.org/en-US/firefox/downloads/latest/39/addon-39-latest.xpi
  • Download All-in-One Gestures: https://addons.mozilla.org/en-US/firefox/downloads/latest/12/addon-12-latest.xpi

Create Firefox Themes and Color for Your Firefox

You are bored with the look and color of your firefox. You want look n feel your firefox more pleasant, Install anycolor add-ons and colorfultabs add-ons. With anycoloe add-ons you can create your own firefox theme and color wheread colorfultabs add-ons color every tabs with different color.
AnyColor add-ons
AnyColor Change Firefox to Any Color and lets you customize your Firefox and create your own personalized theme. A dynamic theme that lets you customize it’s appearance on the fly.
anycolor-firefox-add-ons
Download AnyColor Firefox add-ons
ColorfulTabs add-ons
The most beautiful yet the simplest add-on that makes a strong colorful appeal. ColofulTabs color every tab in a different color and make them easy to distinguish while beautifiying the overall appeal of the interface.

Download ColorfulTabs firefox add-ons

Auto Shutdown PC when Completed Download with Auto Shutdown Firefox Add-On

Most of users will leave the Computer turned on all night when downloading a huge files that may take a few hours.  If you leave the computer while the computer on its mean waste of energy. If you want to save electrical energy and you use Firefox as your Internet browser I suggest to install  auto Shutdown  firefox add-on on your browser. Auto shutdown add-on can monitor download activity and shutdown the computer when download completed. This add-on is very useful if you like to download many files at night and you often leave the computer on to go to bed.
Auto Shutdown features:
  • Executing user scripts after all downloads are finished or computer is idle for specific time.
  • Restore Firefox from last session.
  • Customizable shutdown or idle scripts.
  • Play sound after each or all downloads are finished.
  • Supports DownThemAll.
How to use the auto shutdown add-on:
  • Once installed auto shutdown add-on, it will place a small icon on the Firefox status bar(in the bottom right).
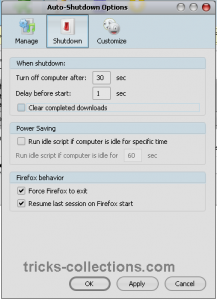
  • Right click this icon to configure the add-on setting. The Auto Shutdown has been enhanced with several options for users to configure the shutdown.
    auto shutdown add-on option
  • Click the icon to activate auto shutdown and click again to disable.
Download auto shutdown add-on. The add-on is available as a free at Mozilla Add-ons.

4 Popular Browsers – Portable Version

Browser is a tool or software for exploring the Internet. Other than the Internet Explorer there are 4 popular browsers on the internet the most frequently used for browsing Internet that is opera, safari, Google Chrome and Firefox.

To easy using these browsers we can use the portable version of the four browsers. Now I will provide info download links portable version of the four browsers.

Why should portable browser? Because portable browser can be used without any installation on computer and very practical to be stored on portable media such as Flash drive, Memory Card or the other portable media storage.
Here download links portable version for latest version of the four popular browsers. If you have download link new version of the browser please reply this article.

How to Stop and Disable Automatic Update on Firefox Browser

By default Firefox enable automatic updates for Installed add-ons (Plugins or Extensions) and Firefox version. When a new or updated version is detected, by default Firefox will automatically download and install the upgrades or updates. This feature is very useful if any new version of installed add-ons (Plugins or Extensions) on Firefox.
But the problem that I often experience is my Firefox crashes after update.  This may be due to some updates that are not compatible. This may be caused by some of the downloadable updates are not compatible.
To stop and disable automatic update on Firefox browser you can follow these steps:
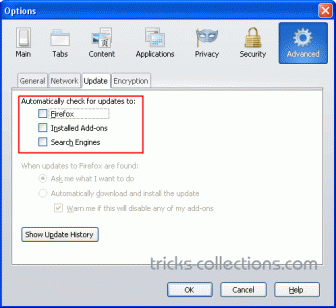
Automatic-Update-Firefox
  • Click tools menu then click Options.
  • Open advanced tab then click update sub-tab.
  • Untick the check boxes on: Firefox, Add-ons and Search Engines then click Ok.
Alternatively, if you wants Firefox to check for updates, But do not want Firefox to install the update automatically, you can activate automatic update then select radio button of “Ask me what I want to do

How to remove Google option on Google Search Result

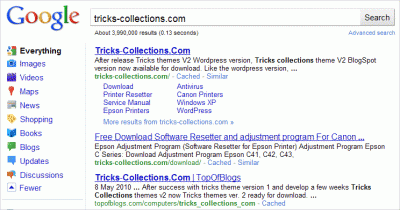
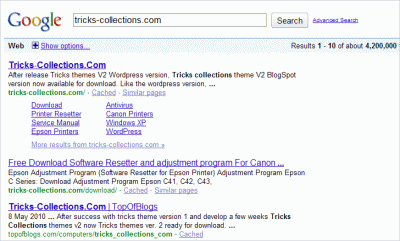
Since May, Google implemented new layout on Google search engine by adding a sidebar or Google option on the left of Google search result page. This option automatic appear after enter a keyword and Google delivery search result to user. Although this Google option is very useful because the option offered new features but some people include me do not like this features because it’s very disturbing for me.
How to disable this feature on your browser? It’s easy I’ll show for you how to remove or disable Google option feature on your own browser. I only provide for four popular browsers that are: IE, Firefox, Google Chrome and Opera.
Here the Screenshot after Google option remove and before:

Google Search resul with google option
Search result with Google Option Feature
Google Search resul without google option
Search result without Google Option feature
How to Disable Google Option on Google search result
A. For Firefox
B. For Google Chrome
C. On Opera and Internet Explorer
  • On IE and Opera no add-on installed requires.  Just enter this URL: http://www.google.com/webhp?hl=all
    on browser address bar
  • And old version Google interface will appear on your browser.
Note: When I tested this tutorial I using Firefox 3.6.3, Chrome 4, IE7 and Opera 10.50 on my computer.

Now Google Translate with New Features and Interface

Google translate now having new interface. Besides the new interface Google also add new features to make user faster translating using their translation tool. As you know Google translate now support for 57 different languages in the word. This tool can translate words, sentences and webpage.
When I try this new Google translation tool, this tool can translate and loading faster that old version. The new features what I like is now I can change translation rule easily because now Google adding a small button to change translation rule instantly.
New Google Translate
What new feature on Google translate
  1. New Look n feel interface to make translating on Google Translate even easier.
  2. Change translation rule easily. You can click new small button between “from” and “To” translation to change translation rule easily.
  3. This new version can load and translate more faster that old version
Maybe the above list is not all new Google translate features. But when I tested this new translate I see the new features listed above. Want to try this translation tool open here: http://translate.google.com
If you Google translate lover might you are interested with google translate clien here: TranslateClient – Free Google Translate Client
Some this blog’s reader who have downloaded the tricks theme ask to me “how to Adding Thumbnail Image on Tricks Theme“. Actually to display thumbnail image in the WordPress blog is easy just install the “Get the Image” plugin on WP blog and paste a small code in the WP theme.
Get the Image plugin is a small WP plugin to display thumbnail image easily in the WordPress blog and the plugin updated continuously. The latest version of the get the image plug-in has support for newest version of WordPress. This plugin can grab an image by custom field input, WP’s post image feature, post attachment, or extracting it from the post’s content.
After installing the plugin you can view thumbnail image in your blog like following picture
thumbnail-image (FILEminimizer)
This tutorial can be applied on all WordPress blog with self hosting. If you have a WP blog on wordpress.com you can’t do this tutorial because wordpress.com not allow user to customize the themes and not allow user to install new plugin.
How to adding thumbnail image on WordPress Themes
It easy, if you are interested with this tutorial you can follow the following tutorial:
  1. Login to you WP blog
  2. Download get the image plugin and install and activate the plugin in your WP blog. You can download get the image plugin from this link: download get-the-image plugin
  3. Copy and paste following code to your WordPress theme where you want to display the thumbnail image in your WP theme then update the theme.
    <?php if ( function_exists( 'get_the_image' ) ) {
    get_the_image ( array(
    'default_size' => 'thumbnail',
    'link_to_post' => false,
    'width' => 135,
    'height' => 135
    ) );
    } ?>
  4. Refresh/reload you blog. Now you can see the thumbnail image has displayed in your blog.
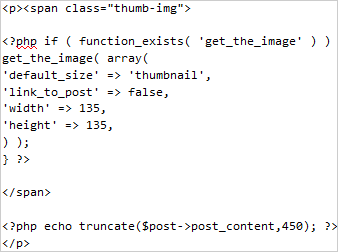
Note: If you Tricks Theme, you can paste the code right before “<?php echo truncate($post->post_content,450); ?>” (view the picture)
thumbnail-image-script (FILEminimizer)
Maybe you are interested with other WordPress tutorial: How to Embed Adsense Search to Wordpress Theme or if you are interested to install SEO friendly theme you can download the theme here: SEO friendly WP theme “Tricks theme V2”

Epson R200, R210, R300, R310 Waste Ink Counter Pad Reset

Here is how to reset the waste counter for the Epson R200, R210, R300 and R310 printers.
  • Press and hold “Stop”, “Maintenance”, and “Power” buttons for about 10 seconds. A message will come on the screen saying counter is reset and to turn the printer off. The R200 and others don’t have a screen so just wait until the 10 seconds is up.
  • Turn the printer off, unplug the power cord. Wait about 1 minute and power the printer back up. The counter will be reset. That’s all there is to the reset procedure.
Is the waste pad full ?
If the waste pad is actually full and ink is about to overflow, then you need to install a waste container. You can see the waste pad by opening the access panel on the back of the printer.
Changing the waste pad requires almost complete disassembly of the printer, it is a big job. There is an easier way.
Open the access panel on the rear of the printer (remove screw) and look inside carefullly with a flashlight. You will see a tube (down and to your left) coming from the cleaning pump and it will have an open end on it. This is the tube that delivers ink to the waste pad.
Use a piece of coathanger wire or equivalent, and fish out this piece of tube. Bring it to the outside of the printer, thru the access panel.
Find yourself a suitable container (Tupperware or a plastic cup or jar) that is not too tall. Put the tube into this container and secure the tube and container so they won’t come apart or lose connection if the printer is moved.
If you wish you can make a hole or notch in the access panel cover so it can be replaced.
Now the ink will go into this container and not into the waste pad inside the printer. If it gets full, dump it.
Note: This information and a couple of photos are also available on Steve’s Digicam Forum (http://stevesforums.com/forums). Goto Printers-Photo Inkjet-Epson R200-210 & R300-310 Mod
Download Software Resetter for Epson R300-310

iPrint-Save your Money by Reducing Printing Cost Up To 60%

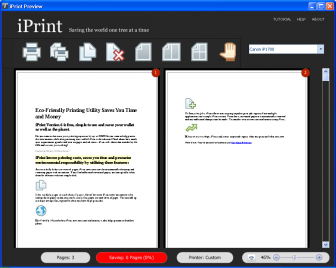
iPrint is a friendly printing utility saves you time and Money to decrease your printing expenses by up to 60%. iPrint now Free for personal or business use and support for Windows XP, Vista and Window 7. While doing print-job iPrint keeps track of print-jobs measuring total savings and displaying handy reports.
iPrint automatically detect and remove pages with no content with options to manually remove unwanted pages easily, iPrint also allows printing multiple pages on each sheet of paper.
iPrint printer utility
iPrint lowers printing costs by utilizing these features:
  • Automatically delete un-wanted pages.
  • Print multiple pages on each sheet of paper. One of the ways iPrint saves you money is by scaling down pages so that you can fit two or four pages on each sheet of paper.
  • Tracks and reports what you are saving
  • Collect print jobs. iPrint allows you to group together print job requests from multiple applications into a single iPrint session.
  • Measure your savings. iPrint tracks your usage and reports what you print and what you save.
Download iPrint now at this link: http://www.clicktoconvert.com/download/iPrintSetup.exe
Other printer utility can be used to lower your printing cost is inksaver

How to Delete a Friend, Leave Group and Page on Facebook

Yesterday I chat with a friend he asked “How do I delete a friend from my friends list on my Facebook Account”.  Finally I found an idea to write an article “How to Delete a Friend, leave Group and Page on Facebook”.
Actually to delete a friend, group or page from our Facebook account is very easy you, only clicking leave or Remove link but we often not see the link. If you want to know how to delete a friend, leave Group and Pages on your Facebook account follow the following tips, but if you already know these tips, maybe this article is useless for you.
How to delete a friend from your friend list
  • Click the friend profile that will be deleted from friend list.
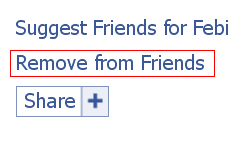
  • Click “remove from friend” (Location of the link on the left bottom).
    Remove Friend from Friend list
  • The confirm by clicking “Remove from friend” button
Out of membership of a group
  • Select the Group that will be leaved from your Facebook profile.
    leave a page
  • Click “Leave Group” on the bottom Picture’s profile of the Group.
  • Then Click Remove to confirm.
How to Remove my Account from Fans of a Page
  • Select a page that will be leaved
  • Scroll down your mouse. And you’ll see “remove me from Fans” Link on the left bottom of page. Click this link to remove your account from fans list of the Page.

Integrate Facebook and Twitter to Gmail

You are interest to integrate social services Facebook and Twitter on your Gmail account. By combining the both social services you can check your Facebook status and your twitter easily just only login to your Gmail account. Its mean to integrate the both social services you must install new gadget on your Gmail because there is no default gadgets are available on Gmail for the social service.
View Facebook status on Gmail
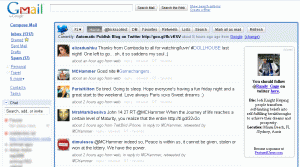
Show twitter tweet on Gmail
twitter-on-Gmail 
Here how to integrate Facebook and Twitter to your Gmail:
  • Login to your Gmail account.
  • Click Setting. On the setting sections click Labs tabs.
  • Enable “add any gadget by URL”  then “save changes” button to save the setting
    activate add a gadget on gmail
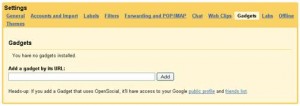
  • Click setting again. Now you will see new tabs named “Gadgets” on setting sections. Click this gadget.
    add a gadget
    Copy this link to gadget form then click add button to install Facebook Gadget:
    http://hosting.gmodules.com/ig/gadgets/file/104971404861070329537/facebook.xml
    And this link to install Twitter on Gmail:
    http://twittergadget.appspot.com/gadget-gmail.xml
Once installations finished you will see new widget in you email account are Twitter and Facebook.
How to see your twitter and Facebook status on Gmail
To view you Facebook status: Click expand on Facebook widget.
To your twitter:
  • Click here link (red rectangle)
    activate twitter on gmail
  • Click “allow button” to allow Gmail accessing your twitter account

Software Epson Resetter T10 and TX100

I get this  download link info software resetter T10 and TX100 from this blog reader but this adjustment program TX100 and T10 is trial version. All features of this software  doesn’t not work but many this blog request this software. I hope one of the reader can make this software work 100%. If you interested to try this software you can download this from the link below.
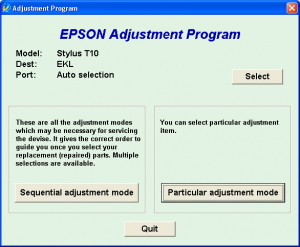
When I try this software on my computer, this software does not respond when I click “particular adjustment mode” or “sequintal adjustment mode”. Here the screen-shot of the adjustment program T10 and TX100.
epson-tx100
epson-t10

This adjustment does not work, dont waste your time to download this software if wont working software.
  • Download link adjustment epson tx100 –> http://www.mediafire.com/file/2dzmkwkjjoa/TX100.zip
  • Download link Adjustment epson t10 –> http://www.mediafire.com/file/neuqgzzmxln/T10.zip
Update: The new adjustment program work 100% to reset waste ink counter only on the Epson T10 and TX100 printer, the software has cracked by orthotamine. Here new download link of the software:

How to Reset Counter Canon ip2770

I found tutorial “How to Reset Counter Canon ip2770“ on Thailand printer forum.  This tutorial to answer all question all about software resetter Canon iP2770 and I hope this tutorial info can help all this blog visitors who need tutorial reset Canon iP2770.
Canon iP2770 is newest all-in-one canon printer that designed for Home and small office user can print with maximal resolution up to 4800×1200 dpi. This canon printer using cartridge type PG-810, CL-811 (PG-810XL, CL811XL Optional) and using Hi-Speed USB 2.0 interface to connected to computer.
Canon Pixma iP 2770 support for Windows 2000 (SP4 only), Win XP, Vista and Windows 7 and also support for MAC OS: Macintosh OS X 10.4.11 – 10.6.
Here the tutorial reset for Canon ip2770 (Click the picture below to view the tutorial – the tutorial are is English and Thai language)
 Note: All Download link and tutorial is taken from Thailand printer forum (http://www.compute.co.th). Use this info and tutorial as your own risk. Here the download link software resetter for Canon iP2770: Canon iP2770 Resetter.

Resetter Epson TX121, T13, T1100

After wait for a long time, finally resetter Epson T13, TX121 and T1100 available on internet. I found the resetter Epson T1100 on indoreset whereas resetter Epson T13 and TX121 on mediafire uploaded by OrTHoTaMiNe.
I’ve tried to run all software resetter on my computer and all software resetter not crash with antivirus installed on my computer (I use AVG) except resetter Epson T13. AVG antivirus detected Epson T23 resetter as Virus. Maybe it caused this software has cracked but I think it not problem, you can disable the antivirus protection on your computer when you want to use this software to reset your Epson printer.
Here the screenshot software resetter Epson TX121 and T1100

Whereas software resetter Epson T13 was detected as virus by AVG, here the screenshot:

Download link software reseter Epson T13, TX121 and T1100:
Download Resetter Epson T13
Download Resetter Epson TX121 also work on Epson ME320
Download Resetter Epson T1100